


The other day, I was going on my computer and had to go through a process to verify my identity and needed to upload a picture of my driver’s license. The first thing I did was groan a little 😂.
This sounds like a pretty simple task but the workflow that I ended up doing was actually a little cumbersome. I didn’t have a picture of my driver’s license on my desktop, so I had two options here.
Turn on my webcam and try to take a picture of it by holding my license up to the camera and then cropping the image properly. Take a picture of it on my phone, email it to myself, then download the image.
I wasn’t really pleased with this experience, so I decided to see if I could build out a better experience in Airkit.
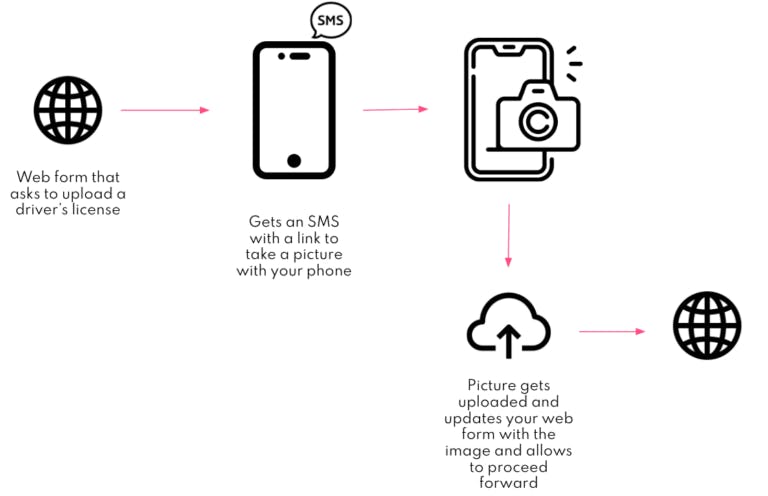
I wanted to create a seamless experience for the end user by using Airkit’s ability to preserve session state across the different channels. The experience starts off with a web form that has an entry for their phone number, which will be used to send off an SMS. This SMS message contains a link to a second app that is tied to the first app through an API and passing the session_id to the second app. The second app, which is interacted with via your mobile device, provides you a way to upload or take a picture with your phone, and then it uploads it to the first app through an App API.
This build showcases how you can tie two applications together and be able to keep the context of one app, while having a simultaneous session that is designed for another task. Another way that I could have built this (which is an easier build actually) is to only use one Airkit application and have the web form send you a link to continue the journey through the mobile device. This way, all you would have to do is have a button on the initial journey that says “Continue on your mobile device” and it will send you a text message with a link to your session to continue with.
Building out the experience that switches to the optimal channel for the customer
I wanted to show this setup so everyone can see how easy it really is. Here’s a video of me walking through building this experience.
In the build, the first application looks something like this:
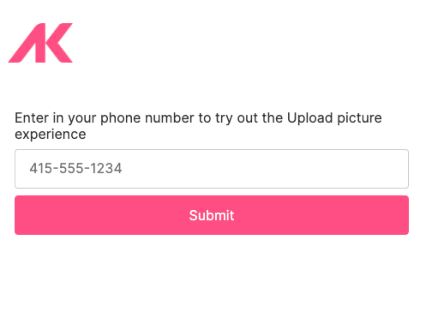
This is representing the desktop application or form that someone would go through. This form simply captures a user’s phone number, but you can imagine this page is a form with other fields on it that you would capture to verify someone’s identity.
On the submit button, this would then send an SMS message to the number that you enter in with a link to a new airkit journey. Here this is triggered via an App API and I send the session_id of the first app to the second app.

From here, the link that gets sent routes me to my second journey that provides me a way to upload a picture. This is a lot more seamless than having to try to take a picture of something on my webcam.
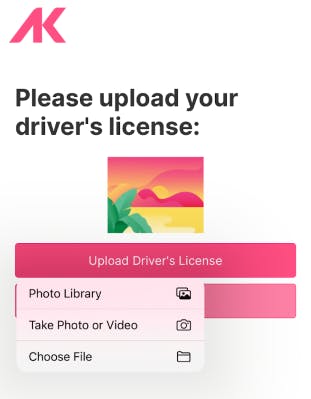
From here, I’ll click on submit, and it will show the picture that I uploaded in the original session that I have on my desktop. Hitting submit will automatically take me from my “waiting” screen to a success screen. I do this by using the passed session_id and use it to run an event on an App API.
Do you want to try it out? Click here: app.airkit.com/channels-blog-post